Tuesday, July 30, 2019

Wire wrapped earrings tuorial

This is a tutorial for wrapping small crystals, beads or pearls onto wire. This technique can be adapted for multiple designs, such as earrings, pendants or bracelets.


Supplies
  • 20 gauge wire
  • 24 - 26 gauge wire
  • hammer
  • assorted beads
  • wire cutters
  • round nosed and flat nosed pliers as needed


Steps
1. Start with your main wire and cut it to the desired length. Form the main structure of your piece.

This will depend on your selected design. For the purpose of this tutorial, I will work with almond-shaped earrings. Hammering the wire will harden it, and depending on what kind of hammer you use, give it a texture.

I found the easiest way to create the almond shapes is to start with a large coil of wire. Wrap it around a round object like a medicine bottle, Then cut it into individual rings.
Use your flat nose pliers to bend them sharply in the middle. Bend them beyond the point where you would like to have them, then pull them apart.
Add swirls or loops at the bottom to attach beads.


2. Cut a long piece of the thin (24 - 26 gauge) wire. The length depends on how many beads you want to wrap.

3. Start by wrapping a few rounds of the wire around the main wire, then add a bead to the wrapping wire. Bring it down tight against the main wire and wrap a loop to secure it in place. Use your fingers to hold everything snug, so it doesn't move.


 4. Wrap a few more loops around the main wire and add the next bead. Keep the same cadence for an even look. Bead, 3 loops, bead, 3 loops, bead, 3loops ...


5. Continue wrapping around the main wire and not how many loops you are making, if you want your beads evenly spaced.  Cut the wire as close as you can. Use your flat nosed pliers to squash it against the main wire. I usually squash and slightly rotate at the same time. Use your fingers to feel for burs.


Variations
Once you master the basic wrapping technique you can experiment with variations.


Saturday, March 2, 2019

I've been published


I have been designing and making jewelry for about 12 years now and I am thrilled to announce that I have reached a new milestone.


My resin earrings have been published in the spring edition of Belle Armoire Jewelry! 

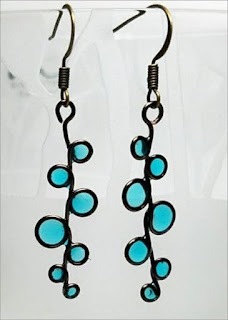
 Blue Resin Earrings


The amazing editors at Belle Armoire Jewelry have put together a beautifully curated collection of artisan jewelry and I am honored to be among the features. This magazine is full of inspiration for jewelry designers, showcasing different styles and techniques that are sure to please a wide audience.

You can find me on page 52. Capture the Sun


 Belle Armoire Jewelery - spring 2019


The issue will be on newsstands for the next 3 months. You can pick up your copy at Barnes and Noble or any of the major craft stores.


Ps: Mom I will put one in the mail for you.


Friday, March 11, 2016

Basic wire ring tutorial


Here is a basic wire ring tutorial that does not require a lot of tools. It is targeted at beginning jewelry makers, with easy to follow instructions. BUT! as with everything you learn, your first few attempts will probably involve some struggle. Just keep practicing and you'll get better.


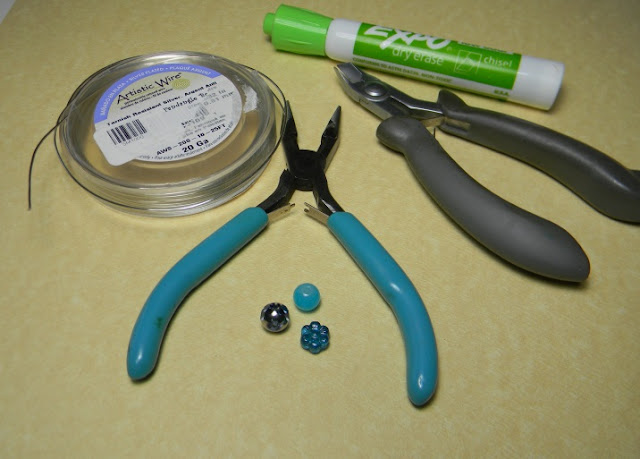
Materials

·         A ring base, dry erase marker, tube of glue, etc. It needs to be thicker than your finger!
·         About 15 inches of art wire
·         Bead of your choice
·         Flush cutters
·         Flat nose pliers 


Instructions

1.       String the bead on the wire and place it in approximately the center. Pinch the wire down on either side of the bead.

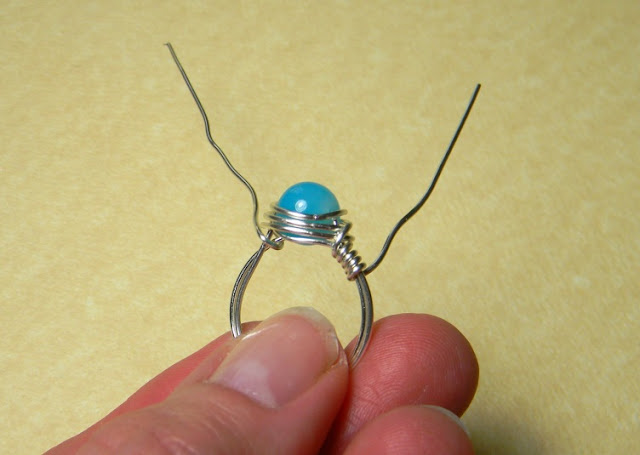
2.    Place the bead on your base, hold it down and wrap each end of the wire around the base. Go past the bead on each side. Remember not to cross the wires. Tighten the wire as much as you can. 


3.       Hold the wire tightly with your finger and snugly bend it around each side of your bead, in opposite directions. You want to start forming a circle around your bead.

4.       Wrap your bead several times with each end of the wire. Finish with each wire end on opposite sides of the bead.  You should have at least 2 - 3 inches of wire left on each side.


 5.  Slide the ring off the base and wrap the wire ends around the ring on each side to secure the shape. This will bring your ring wires together and form them into a solid base. 


 6.       Flush cut the wire and flatten the end against the ring to eliminate the burr and sharp edges. Don't cut the wire on the inside of the ring, or it may end up scratching your skin. Try to cut at the top or side. Use your flat nose pliers to "squish" the cut edge down.


Yay! You're done!


Play around with variations

1.       Use smaller wire and wrap it multiple times
2.       Use smaller beads
3.       Wrap your bead a lot, or just once
4.       Try different shapes of beads
5.       Wrap your ring base all the way around
6.       Try different colors of wire 


Saturday, October 11, 2014

Happy Autumn, Welcome Fall!


Don't you just love the colder weather that comes with the changing of the season? The leaves are starting to turn and the smell of wood smoke is in the air.

I love the colors of fall, so it's no surprise that they keep showing up in my jewelry.


One of my necklaces was included in this great Etsy treasury, featuring Virginia artists.

Take a moment to check out these wonderful products.

https://www.etsy.com/treasury/OTY0OTE4N3wyNzI0MzQ0OTM5/awesome-autumn?index=0&ref=l2&atr_uid=
 
 
Leave me some comments and let me know how you incorporate the colors of the season into your creations, products, etc.

Friday, September 26, 2014

Home sweet home


We have a new home!

It is such a great feeling after a year of fixing, staging, showings, inspections, etc.

Granted, we've been here for about 3 months now, but it is truly feeling like home now.
Look at our brightly painted happy door? It's such a cheerful feeling to come home to that.

 
The kitties prefer the front door view from the inside out.


One of the best things about the house is that I get my own craft room. I no longer have to live in one corner of the living room. Now I get to spread out. Yay! In reality it just means more work mess to clean up. But hey, I have yet to see a creative person's work desk that was not utterly cluttered.


All my beading supplies have been sorted out and I get wonderful morning light through the window. Sunday mornings, while the kids are lingering in bed, is my favorite time to sit and play with my pearls and wires.

Besides the jewelry work, I have also spent a lot of time in the garden. I just finished putting in raised beds and was able to get the winter veggies planted before the nights got too cold and the days to short. With any luck, we'll have assorted greens and lettuce to munch on in a few weeks.


And my biggest house project so far has been painting the downstairs living room. We're going from a dark, wood paneled cave to a bright and happy playroom. If you've ever painted paneling you know how long it takes. Cleaning, hole filling, sanding, primer, prime again and then paint two layers. But the results are soo worth it. I can't wait to show off the finished room.
 
 
Okay, now back to work! and have fun!
 
M
 

Tuesday, January 14, 2014

Boxes boxes everywhere ...

... and I can't find my stuff.

When I last left this blog I was dreaming of a cute white cape with a picket fence and sunflowers.

I've been REALLY busy trying to make that dream come true. More than half of our house is packed up and everything has been painted, patched and cleaned. There are new windows and new carpet and the house is gorgeous. It finally went to market early January! Yay!

Now we just need to find a buyer.


http://www.realtor.com/realestateandhomes-detail/3605-Whitehouse-Rd_Chesterfield_VA_23834_M64224-89639?row=60

You know what else I need to find?

Everything!

In the haste to pack up the house for the real estate photos, I packed up everything that wasn't already in a drawer, including my beading supplies. My beads were nicely sorted into small boxes, then those boxes went into bigger boxes and a few ended up in even bigger boxes. You get the idea.

The other day I had to restring some pearls (they turned out beautiful, btw.) but it took me 30 minutes to find the right string, my tools, the bead board, etc. And its not just beading supplies. Everyday household tasks turn into treasure hunts. Kids! Help Mommy find the muffin pan! First one to find it gets an extra muffin!

Lets hope for a quick sale so that we can get moved into a new house before someone asks me to find the Easter decorations.

Sunday, October 6, 2013

Dreaming of a new home

I decided in August to sell my current house and move to a new place. After talking to my girls, we have decided on all the features that this new house MUST have.

A cute white, cape style house with a picket fence and sunflowers nodding their big heads, greeting all the new neighbors. Of course, this new house is also in a good school district, close to my work and must have lots of kids in the neighborhood for my girls to play with. Oh yes, it also must have an art studio for my youngest and me and a fully furnished and stocked library for my oldest daughter. This new house must have a built out attic, cause that's what my oldest wants for her room. And it should have a room for each of us, plus one for guests.  My youngest insist that the new house cannot be made of brick, because she doesn't like the way it looks. Personally, I would love a completely maintenance free house where all appliances and the heat/AC unit will work at minimum energy consumption and will never break. A fully stocked wine cellar would be a plus but isn't a must have.

Meanwhile, in the real world ...

I have spend the last few months fixing up all those little things in my current house that you learn to live with. A small hole in the ceiling, rusting railings outside, old, worn out paint, replacing scratched up trim work, etc. If only the cat would learn to meow instead of scratching the outside door frame. I have boxes stacked everywhere and have no idea where to hide them, should potential buyers want to see the house. My girls have a hard time remembering to pick up after themselves, so who knows what they may find lying around. Oh dear.

But I'm getting closer to selling. And with that, closer to facing reality. I have a feeling that we won't quite find a house that fits all the must haves above.

But, a girl can dream ...